Do you have the sole that always encourages you to travel? Many people dream of traveling the world.
Would you believe if I say you can make your living and earn millions with full-time travel life?
This is not impossible. Because many people are doing travel blogging and making millions of dollars per month.
Why don’t you?
The cool thing is, you can start a travel blog after reading this article and start your journey today.
In this article, I will discuss how to start a travel blog and everything related to it.
So let’s get started.
Page Contents
Pick your domain name
To run a blog you need to have your own domain name. Your blogging journey starts with a domain name. This is the name people will remember and use it to land on your blog.
Amazon.com, Facebook.com, YouTube.com, Twitter.com are some examples of the domain names.
This is something that can’t be changed in regular intervals (or never) as it carries the identity of your blog.
So picking a domain name is crucial in the beginning. There are no hard and fast rules on picking a domain name.
Domain names are like real estate. You need to pay the rent to have one. Domain names are priced annually. The price varies from registrar to registrar. Usually the .com domain costs around $10 – $15 per year.
But the following tips would be helpful for picking an awesome domain name for your blog.
Note – I have already written an in-depth blog on how to choose an awesome domain. So feel free to check that one once.
Keep your domain name short
Short and meaningful domain names are always good as it has many advantages.
The domain name has less than 15 characters are always good.
A single word domain name is worth finding but very very rare. If you are lucky enough, then you may find one.
You can combine 2 or 3 words relevant words and make a meaningful domain.
Always go for the .com domain
The .com extension is considered as the king of all extensions. According to a survey, more than 70% of all websites have a .com domain extension.
People are more acquainted with the .com domain as it is mostly used. By default, people assume this domain extension with any domain.
When you are in search of a domain name then go with .com domain only.
Avoid including trademark names
Always stay away from trademark names and never include them in your domain. If you do this, then you may face serious legal action in the future.
Before choosing a domain name, it would be a good idea to check the trademark name database. For this, visit Wipo.int and search the name.
Don’t include a year
Adding a year is a common mistake among new bloggers. This is a bad practice and you should never do this.
After one year the domain would seem old and outdated.
It is also good practice to not include any numbers in a domain name.
Buy instantly before someone else takes it
Domain names are selling quickly. So search for a good domain name and make your decision quickly.
I recommend you to buy your domain name today.
Thousands of people are actively searching for domain names and once they find would book it for them. (I have faced this many times)
You can delay to write and publish your first post. But don’t be lazy on domain name buying.
GoDaddy, Bluehost, Namecheap are some of the best domain registrars you can choose from.
I personally prefer to go with GoDaddy (The biggest domain registrar in the world).
Buying a domain name is very similar to purchase something on Amazon. So I am not discussing the steps here. You would do it easily.
Choose a blogging platform
To start and manage your blog, you need a platform. There are many blogging platforms available. Some of the examples are Blogger, WordPress.com, and Tumblr, etc.
If you want to start a blog for free, then you can choose the above option. But the above platforms have serious limitations and I never recommend to go with the free ones.
If you choose a free blogging platform then you would face various difficulties in the future. You may take it to make some fun and experiments.
There is an option to go with a custom-coded website. But it is pricey and as a beginner, I don’t recommend to go with this one.
I recommend going with Self-hosted WordPress. There is no limitation in it and you’re absolutely free to customize it completely.
When I am saying self-hosted WordPress (simply WordPress) it is WordPress.org. There is much difference between WordPress.com and WordPress.org.
WordPress is the most popular content management system (CMS) in the world and powers 35% of the internet.
You would have the option to install WordPress for free with your hosting plan. After installing WordPress, you can manage the whole site through this CMS tool. We would discuss it later in this article.
Sign up for a hosting
After picking your domain name now its time to sign up for hosting. This hosting will store all your blog files and helps to keep running your blog.
There are a lot of hosting companies. One can easily get distracted by the wrong one.
I like A2 Hosting and have been using it for more than 2 years.
I am going to show you how to buy a hosting plan from A2 Hosting step by step.
First, visit A2 Hosting’s website.

Click on the Shared Hosting option in the top navigation menu
On the next screen, there would be 3 hosting plans. You might be confused about which option is best for you.
As you are just starting your blogging journey, you don’t need to take a lot for hosting spaces.
In A2 Hosting Shared Hosting plans, you can choose the Lite plan. This would be sufficient for your travel blog. You may choose the Swift Plan as well.

So click on Get Lite option.
On the next step, you need to enter the domain name of your blog. As you are here, I assume that you have already purchased the domain name.
If you have not purchased a domain name yet then buy it now. If you have already purchased a domain, then choose the option “I will my existing domain and update my nameservers”.

Enter your domain name and extension on the appropriate field. Then click on Use.
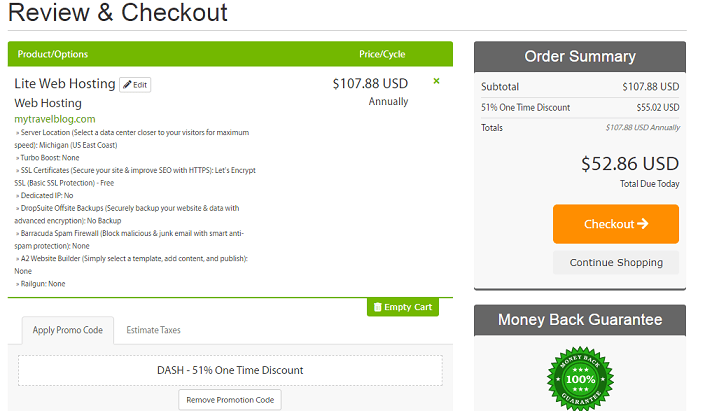
On the next screen, you would be inside the cart. By default, A2 Hosting set the plan for 36 months.
Click on the dropdown list and choose 12 months plan.

If you click on the below link, you would get a flat 51% discount (offer is for a limited time).
Check the Customize Your Hosting option. Make sure that you have not any extra service added in the cart expect, hosting.
Once you ensure, everything is correct, click on the Continue button.
On the next step, review your plan and click on the Checkout button.
Next step, you need to enter your personal details and billing information to checkout. On the Account Security field, enter the password and security questions. You would use this password when login to your A2 dashboard after sign up.

Once you fill all the required information, check the “I have read and agree to the Terms of Service” option.
Then click on Complete Order.

Now you have successfully signed up for the hosting.
You will get a confirmation email with all the necessary details.
Note – A2 Hosting provides a 100% money back guaranty. That means if you don’t like their service, then you can cancel it anytime and get a refund. I have been using their service for a long time. I have not faced any issues.
Above all, A2 Hosting also offers 24/7 world-class customer support via live chat, telephone, a ticket-based system. So if you ever need any hosting-related assistance, they are available for you all around the clock.
Connect your domain with hosting
As of now you have the domain and hosting. Now its time to connect them both. After the connection, when someone visits your blog, the hosting server will serve your blog pages.
No matter where you buy the domain, you would have the option to change the DNS records.
No need to worry about the technical terms. You need to do it once and the process is very simple also.
Go to your domain registrar control panel and find the option to change DNS.
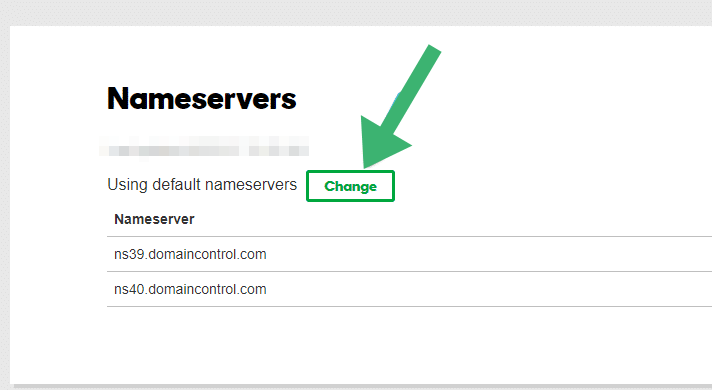
Find the nameservers for your A2 hosting account.
To find nameservers in A2 Hosting, login to your dashboard first. Click on the Account details. You can also get the nameservers in cPanel.
Copy the name servers and paste it in the domain control panel.
Once the process successfully completed, allow up to 24 hours for DNS to fully propagate worldwide.
Install WordPress
Once you connect your domain with hosting, the next step is to install WordPress. There are two ways to install WordPress in your hosting.
One is manually and another one is through cPanel using Softaculous. In this post, we would discuss the Softaculous method. This method is more simple with A2 Hosting.
Follow these steps to install WordPress through Softaculous.
Log in to your A2 Hosting account. You would find an option to log in to your cPanel.
Go to Softaculous Apps Installer section

Click on the options WordPress – A2 Optimized
On the next screen, you would be inside the Softaculous. Click on Install.

Fill the WordPress installation details.

After filling all the fields, click on Install.
Softaculous will check the submitted data and start installing the files to your server for WordPress.
After a successful installation, you would get the confirmation. On the next screen, you would get the admin URL.
Basically, the WordPress login page is domain name/wp-admin. But A2 Hosting cares about your site security. So it hides the admin login URL to keep your site safe. Note that URL. You will use the URL to login to your WordPress dashboard.
Install a theme
After installing WordPress, a default theme would be installed. The latest version of WordPress installs a theme named Twenty Twenty.
The default theme lags in features and doesn’t have a good user interface. The good news, there are hundreds of themes available for free in the WordPress repository.
The theme controls the user interface of your website. There also various customization options is available.
Best WordPress themes for travel blogs
These are some of the best WordPress themes for a travel blog.
To install a theme in your new blog, follow the below steps.
Login to your WordPress dashboard
Go to Appearance > Themes > Add New

Search for the above name and install it as per your choice. Once you install one, then go to Appearance > Customize to edit various aspects of your blog design.
Install some essential plugins
After installing a suitable theme, the next step is to install some plugins. WordPress plugin enhances the capability and adds some features.
There are over 50,000 plugins in the WordPress repository. Basically, you would find a plugin for almost every need.
To install a plugin go to Plugins > Add New
Akismet Anti-Spam – It is the best anti-spam plugin in WordPress. This is the best way to protect your blog from spam. Go to your Akismet Settings page to set up your API key and you are good to go.
Yoast SEO – The most widely used and best SEO plugin for WordPress. This helps you to optimize your blog for on-page optimization. It helps to optimize title, URL, meta descriptions for your posts. It also creates and submit a sitemap for search engines.
UpdraftPlus – UpdraftPlus is a good option to take automatic backups. This plugin will keep the backup files in remote storage like Google Drive. You can restore it if needed.
Google Analytics for WordPress by MonsterInsights – Track your traffic through the MonsterInsights plugin. Just connect your Google Analytics to this plugin. Then you can track your traffic directly from your WordPress dashboard.
Note that these are not the only plugins to have on your site. According to your need, install other plugins.
Create some essential pages
As the name suggests, there are some essential pages in a blog. This means you need to create it in the beginning. There are
About Us page – On this page describe something about you. You can start from the history as well. This gives readers a clear view of what the blog is all about and what message you want to pass to people.
For a clear understanding, you can check other blogs. Tell people about your experience in travel and what you have learned.
Contact Us page – This is the page where you need to provide contact information. This will help interested people to contact you.
Create a custom email with your domain name. Your domain name would be like contact@domainname.extention. With your hosting plan, you will get the option to create this type of email.
Privacy Policy page – A Privacy Policy is probably one of the most important and legal agreements for your online business. On this page describe whether you are collecting personal data or not, uses of cookies, etc. on your website.
Disclaimer page – Disclaimer page is also known as the Terms of Use page. It protects you from lawsuits and liability. This page is also important in a monetization point of view.
These are some of the essential pages you need to have in your blog. In the beginning, you need to add these pages to your blog. In addition to this, you can add other pages according to your needs.
Learn some WordPress basics
You have installed WordPress and also installed a nice looking themes. As WordPress is going to be your next home, you need to learn the basics.
I have written a compressive step by step guide to learn WordPress CMS. So feel free to check that out to know more.
Write your first post
Once you complete all the above steps, now it’s time to write your first post. Writing the first post is always contains lots of energy and motivation.
Find some topics that you would cover in your blog and make a list of them. There is no hard and first rule what to write in the first post. It’s your blog and starts with whatever you want. It completely depends on you.
If you have traveled somewhere in the past, then you can start what one of them. Describe all your experience from the beginning of the journey to the end.
To get some idea, how to write travel blogs, you can visit some other blogs.
Do some basic SEO
SEO stands for search engine optimization. This the practice of optimizing sites for search engines.
This a vast topic and can’t be covered here. On the surface level, you can optimize your individual post to rank on the first page of Google.
If you have installed SEO plugin like Yoast, then it recommends you various steps.
Submit your site to Google Search Console
One of the most important things many new travel bloggers miss is to submit the site in Google Search Console.
To show your posts and pages in Google search results, you need to submit the blog in GSC. To get your site listed on search results, Google needs to “crawl” and “index” your content.
Follow the steps
Go to Google Search Console.
Login or click ‘Start Now’, if needed.
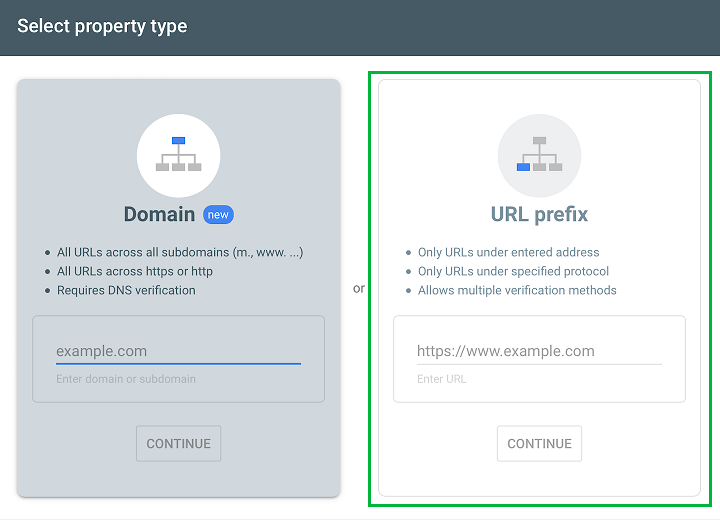
Click ‘Add property’ under the search drop-down on the left side on the page.

Google allows you to verify the site ownership through 2 methods. One is a domain level and another one is the URL level.
Choose the URL verification and enter your website URL in the box and click ‘Continue’. Enter your exact URL.
Then Google will show you various verification methods. Choose the HTML tag method. Click the arrow in the ‘HTML tag’ to expand the option.
You need to place one line of code on your blog’s header. Install the insert header and footer plugin and place the code in the head section of it.
Once you place the code in your blog, go back to the Google search console and click verify.
Congratulations! You’ve successfully connected your website to Google Search Console!
Next submit your, sitemap to GSC. Then Google will take its time to crawl and index pages.
Create social media profiles
Make your presence on social media platforms. This helps you get new visitors to your blog. This also helps in the beginning days.
Create social media profiles on various platforms like Facebook, Twitter, Instagram, etc.
Post your published articles there and drive traffic to your blog. Post regularly and you would get new followers as well.
Promote your blog
You have made an amazing blog and written many quality content. Now its time to promote your blog.
As you have made social media profile for your blog and posted something, you can promote them. You can run ads to reach many people in less time.
There is also the option to run Google ads that shows your page in Google Searches and display networks.
This way more and more people will know about your new blog.
How to make money with a travel blog?
There are many ways to make money with a travel blog. In fact, you can live throughout your life through the income of this blog.
Google Adsense
You can place Google Adsense in your blog and get paid. This is the biggest display ad network in the world and you can make a decent income if you have traffic.
Affiliate marketing
This is the best source of income for a travel blogger. You can recommend people to buy some products and earn a commission based on it.
Join some affiliate programs like Amazon, Booking.com and recommend your audience. When they would buy products or services from your link, you earn a commission.
Sponsored content
The brand pays to publish a post on your blog. You can allow them to do so and charge for each post.
Selling products
You can sell products on your blog and earn money also. This may be a physical or digital product.
Is it too late to start a travel blog in 2020?
Many people ask me is it too late to start a travel blog?
My simple and only answer is NO.
Travel blog was very crowded a few years ago. At that time many bloggers wanted to enter this niche and became a travel blogger. But they quite after some time as they have no vision.
At that time there are not many monetization options also. People were also struggling to get paid for their work.
Now everything has changed and you can make your living with travel blogging.
Now there is a lot of option for monetization and you can earn in many ways.
So this may be the perfect time to start a travel blog.
What are you waiting for?
So here’s the link to get started with A2 Hosting today where you can save 51% instantly.
Create a YouTube channel to maximize the earning
We are living in the age of videos. YouTube is skyrocket nowadays. People are watching videos like never before.
So creating a YouTube channel is a wise idea.
As you are traveling around the world and exploring places, you can make videos of them. People have the curiosity to see new places and you can make available them.
In the beginning, if you can’t afford an expensive camera then it’s OK. You can record videos using your smartphone. These days a smartphone is also rich with camera specifications and you can easily record HD videos using it.
After recording, make some edits and publish it to YouTube. The best thing is, you can monetize your videos and earn money from them.
This way you have multiple sources of income. You can also place a link to your blog in the YouTube video description and drive traffic to your blog.
Frequently Asked Questions
How Much Does it Cost to Start a Travel Blog?
To run your travel blog, there are some upfront costs. It includes the price of domain and hosting.
The cost of a .com domain is under $10 (per year) and the best hosting plan of A2 Hosting is around $3 per month.
In the beginning, you don’t have to buy fancy stuff like premium WordPress themes or plugins. There are a lot of good themes available in the WordPress repo for free.
Is the travel niche too saturated?
No, the travel niche is not saturated yet. Many people are in this space but don’t work seriously. Very few people taking it seriously and make their living with it.
There is always a space for a new blog like you.
Can I make money from travel blogging?
Yes, you can make a lot of money through travel blogging. There are many ways to earn from a travel blog.
How much I can earn from it?
There is no limit. People are making more than $100,000 per year through travel blogging.
What do things need to start a travel blog?
You need to have a domain, hosting, smartphone, Laptop, and dedication.
Should I buy a travel blogging course?
No, it is a waste of money. You can learn everything for free. As you start entering this orbit, you would learn. If you stuck somewhere, then Google it or watch some video tutorials on YouTube.
Just buy a domain and hosting today and you are good to go.
Conclusion
Everyone wants to be a travel blogger. But most of them quit early and few get success. You would be get paid to travel around the world. This might be a dream job everyone wants to do.
The world is waiting to read your travel story and tips. What are you waiting for?
Buy your domain name and buy a hosting plan from A2 Hosting and start your blogging journey now.
Start your travel blog today before it’s too late.