Is your phone running out of space? Is it showing a pop-up with “insufficient space” written over it, whenever you want to store something? Do you want to know how to move apps to SD card without rooting your device?
Well, most of the time this problem arise if you are using a lower version Android OS with less internal storage in your device.
If you keep adding photos and massive videos into it and not in the SD card.
Then eventually your device run out of space.
And If you installed some big space eating apps in it, then it will keep telling you to free up some space from your internal storage.
Nowadays when the smartphones are becoming more effective with the new Android OS and large internal storage in it but User still facing the same problem.
Many smartphones come with only internal storage of 16GB or 32GB, with a chunk of that already taken up by the Android operating system and preloaded software.
And with the passage of time, internal storage gets reduce in addition to high-quality videos or movies and with other apps. Especially the large gaming apps.
However SD cards still the nicest option in today’s market to extend the storage capacity of your smartphones.
You can relocate your photos, videos, movies and also the apps to the SD Cards for free-up some space from your internal storage.
But devices like Apple I-Phones or Google Nexus they don’t allow you to use Micro SD card in their devices.
As they believe that the open system might lead to more complexities like a security issue, bugs, slow speed, and viruses.
So they offer more internal storage instead of given micro SD support.
Page Contents
Move apps to SD card (Without root)
If you have an android phone that supports Micro SD card in it, then the good news is you can import the apps to micro SD card (external storage) from the internal storage.
By which you can free up some space in the internal storage and your device performance will improve.
Then I must say that you arrived at the right place.
In this article, I’m going to tell you about how to move apps to SD card without rooting.
Before I tell you the methods, read the precautions below and remember these as a final warning.
- Not all apps can be moved to SD cards especially those who come preloaded on to your phone. Along with some other apps, depending upon the developer and what type of phone you use.
- Apps may be run slower when they moved to SD card as comparable when they are on internal storage.
- If you are using a widget of a certain app, then don’t move it to SD card. It might not perform well after the move.
- Some important tools might not perform well when they move to the SD card.
- If you can’t afford certain app becoming unavailable after the move, then don’t move it.
- If you want to move all your apps to the SD card, then you will have to root your phone.
But that is not what you urge.
In this article, I’m going to tell you exactly that, what you want.
Here I have three solutions to your problem.
Method – 1:- Move Apps To SD Card By Using Default Settings.
Method – 2:- Move Apps To SD Card By Using An app called “App Mgr III”.
Method – 3:- Move Apps To SD By Using “ADB Commands”.
So let’s start.
1. Using default settings
Follow the steps to move apps to the SD card without rooting.
Step – 1
Go to your device settings menu and find the option Apps.
Step – 2
Then tap on the option Apps and You will see the apps that present in your phone.
Step – 3
Now click on that app which you want to move to your SD card (external storage).
Then you will arrive on the App info page where you can see details about that app.

Step- 4
Click on storage option and you will see a move to SD card option there.
If the move to SD card option will be greyed out, then App can’t be a move to SD card.
If not, you can proceed to the next step.
Step – 5
Then tap on the move to SD card option and the app will be moved to the external storage of your device.
After the app move, the internal storage of your device will be free-up in some amount.
Though this process seems to be very easy, there is some limitation to this method.
You will be only able to move some section of that app. I.e. You can move only the APK part. The data part of the app will remain on the internal storage.
If this method is not working, don’t worry we have still two methods left.
Also, read – best Instagram downloader online
2. Using an app called “App Mgr III”
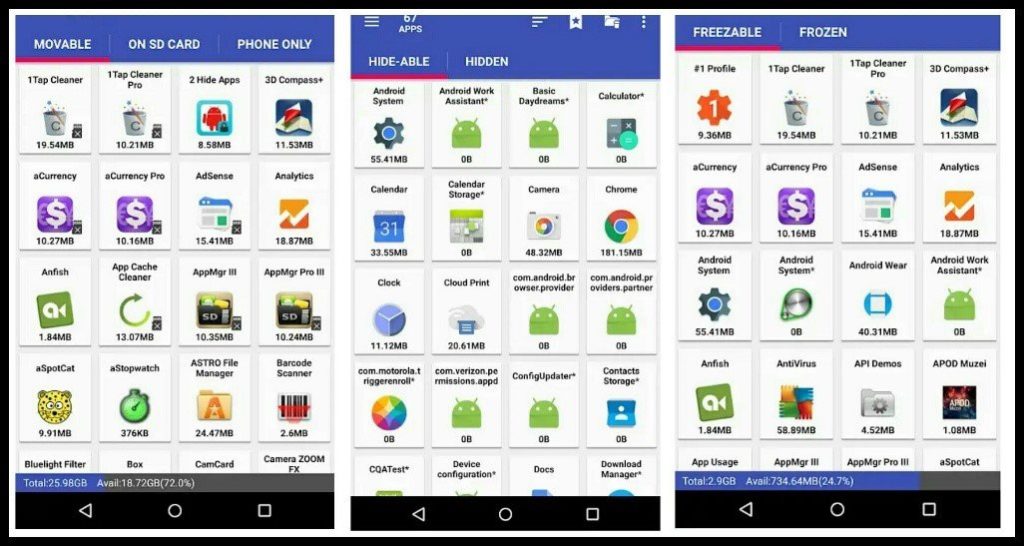
“App Mgr III” will help you to move your apps to SD card without going for rooting your device.
It automatically checks the apps and notifies you when an App can be moved.
This app is very crucial for those whose device is running out of space and wants to free up space.
This app manager has also some features like.
- It will identify the apps which can be moved to external SD card.
So you don’t need to check each app individually whether it can be a move or not.
- You can freeze apps in it, so they don’t work and use CPU or memory resources and consume zero battery.
- You can also able to uninstall apps in it.
- It also helps you to hide the app from the App Drawer.
- Along with these features, it has a sharing option i.e you can share your Apps with others through Bluetooth.
It is an App manager but the main motto of this app is to move the apps to external SD card and vice versa.
To run this app you need jellybean or higher version of Android OS on your device.
Follow the below steps.
Step – 1
Download and install this app from Google Play Store.

Step – 2
Open the app and under the heading “movable” you can see those apps which can be move.

Step – 3
Click on the app from the list which you want to move on your external SD card.
And you will land on the App Info page.
Step – 4
Then click on the “move to SD card” option to move it.
And the app will move to your external SD card.
If you don’t see the change button (move to SD card). Then go to
App Mgr III > Settings > about > FAQ for details
Because some devices may not be supported this feature.
The only problem arises with this app is you can’t move the data of large games i.e the obb files.
In such cases, it only moves the APK part the data of the app still on the internal storage.
If you want to move the obb files you must have to root your device.
3. Using ADB commands
This is the third method in this article. In this method, I’m going to tell you how to install android apps on the SD card without rooting your device, by utilizing ADB or Android debugging bridge.
This is similar to that of command promote windows.
I will tell you how to change the default storage location of your apps from internal to external SD card by using this method.
Before going to start this process keep these things in mind
- Move your all data from the SD card to Internal storage, so that will not be corrupted during the process.
- Download and install the Java development kit (JDK) on your Pc.
- Also, download and install the Android software development kit (SDK) on your Pc.
- Disable the antivirus app and firewall on your Pc.
- Enable USB debugging on your Android device.
How to enable USB debugging?
Go to your device settings and click on “About Phone” option.
Tap on build number continuously till you see a pop-up on your screen which written “you are now a developer” on it.
Now go back and you will find a new option named “developer setting” in your device settings
Then click on it and search for the USB debugging option and enable it.

Now open Android SDK that you downloaded on your Pc.
Then navigate to adt-bundle/SDK for the “platform tools” folder.
If you can’t find the folder, search the folder or directory. It always in the SDK app.
Now go to system preferences > keyboard > keyboard shortcuts > services.
Now check for an option named “New terminal at folder”.
After that connect your android device to your Pc with a USB cable.
Utilizing ABD
Now open the folder called “platform tools”
Press shift + right-click anywhere in the window and select the option “open command window here”.

For Mac users:-
Right-click on the folder named “platform-tools” and choose “new terminal at folder”.
Now enter the following commands.
If your device is running on the lower version of Android than Android 4.
Then type:-
adb shell pm getInstallLocation (you will get the default location as auto.)
adb shell pm setInstallLocation 2 ( It would set the apps installation location to external SD card)
adb shell pm setInstallLocation 0 (If you want to set the default installation location to internal storage)
If your device running on android 4 or higher.
Then type:-
adb shell pm get-Install-Location (To get default location as auto)
adb shell pm set-Install-Location 2 (To set the app installation location to external SD card)
adb shell pm set-Install-Location 0 ( To set the default app installation location to Internal storage)
If you are a Mac user and operating this process, then you have to add [ ./ ] before every command.
For example – ./adb shell pm set-Install-Location
If you performed the steps correctly, you should able to see the last output as 2 (external SD card).
Now you can able to install the Android apps on the external SD card instead of internal storage.
Also, read – Best free Windows registry cleaners
Conclusion
That’s it, These are probably the easiest methods which I recommend to move apps to external SD card no root applied.
You may apply the default settings method or the App Mgr III or the ADB Commands to change the storage location of your Apps.
But if you still facing difficulties then I suggest you that you should root your device by using the best rooting apps for Android.
So that you can able move/install apps on the external SD card instead of internal storage and enjoy free space.
The region why I’m suggesting to root your device because the Android OS varies from device to device and also work on different methods.
